Picasa, produced by Google, is a free, easy to use tool for organising and editing your pictures. You can use it for lots of image related things, but this tutorial will focus on using it to resize images to the correct size and format for use on this website, silver-collector.com. These are the basic steps we will go through…
- Download and install Picasa.
- Run Picasa for the first time.
- Explore Picasa’s ‘folder manager’
- Crop your image
- Export your image in the right size and format for silver-collector.com
So lets begin…
[b]1. Download and install Picasa from…
2. First Run and Initial Import
The first time you run Picassa you will be given the opportunity to select where Picasa should look for your images. You can choose to scan the whole computer or just your ‘my documents’, ‘my pictures’ and desktop folders. I recommend the second option for most users. Once you make a selection, click continue and wait as Picasa adds the images to its database.
Note: Picasa does NOT move or edit your images during this initial import. It simply makes a record of where the image is and gives you an easy way to get to your images no matter which folder they are stored in.
3. Using Picasa’s Folder Manager tool
Picasa is first and foremost a tool for organising your photos. It is possible to import single files but to use Picasa at its best you need to think in terms of folders. Picasa watches the folders you specify and updates its records as you add or edit images.
First create a folder for the images you want to post onto silver-collector.com. This can be anywhere, but on the desktop or in ‘my pictures’ is probably best. You can name it whatever you like. I’ll name mine, ‘silver-collector’.
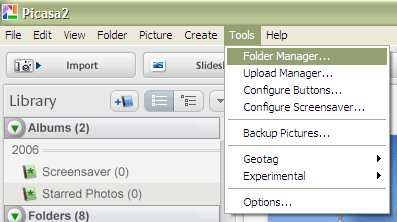
Open Picasa and go to tools > folder manager…
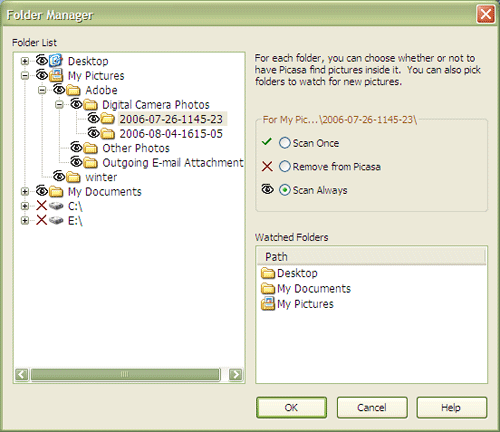
The folders you see in the folder list on the left are the ones Picasa found on your initial import. You can select folders in this list and then change whether Picasa watches this folder using the options on the right. Whatever folders you specify, Picasa automatically scans all sub-folders.
If I click the small plus next to the desktop folder, I can see a list of the folders I have on my desktop.

I created my silver-collector folder on the desktop and I can already see it in the list. Note that it has the eye symbol next to it indicating that Picasa is already ‘watching’ this folder for images. This is because Picasa is watching my desktop folder and it automatically scans all sub-folders as well. If we had created the silver-collector folder outside of one of the folders Picasa is watching, we would have to select it in the folder list and then select ‘scan always’ from the right hand options.
Put the image(s) you want to prepare for the web site into the ‘silver-collector’ folder using the normal Windows file explorer.
4. Crop your image
Open Picasa and select ‘silver-collector’ from the list of folders on the left. The images in that folder will be displayed on the right.
Double click the image you want to prepare. You will be taken to the image editing page.
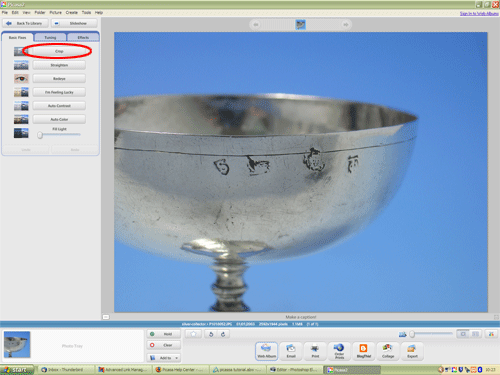
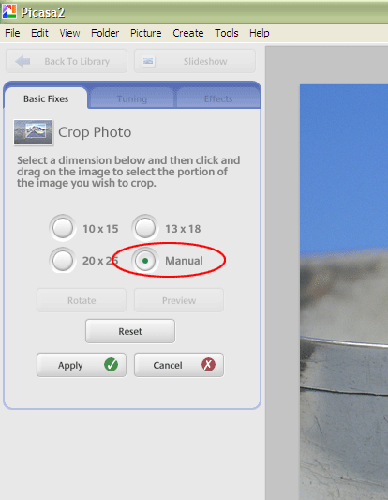
There are lots of options for you to play with here but the one we are interested in is ‘Crop’. Select it and you will see the crop options.
Select ‘manual’.
Place the mouse pointer to the top left of the area you want to crop and click and drag a rectangle covering the area which you want to be left with after the crop.
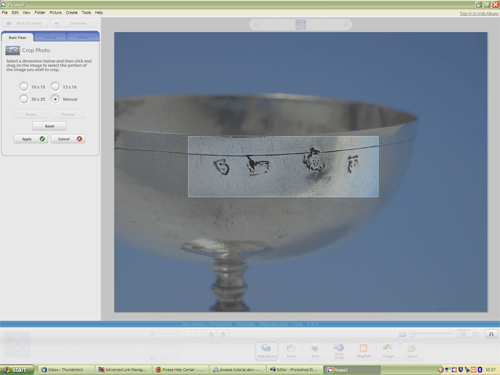
If you are unhappy with the result, click ‘reset’ and try again.
Once you have the crop the way you want click ‘apply’
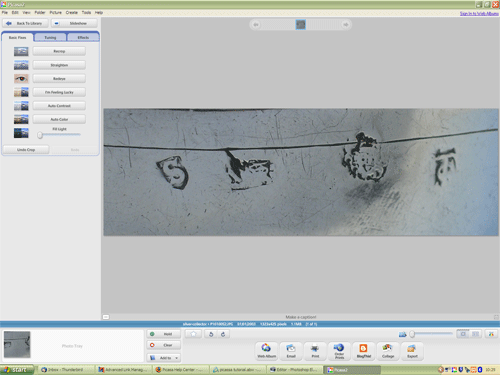
5. Export the image ready for uploading to silver-collector.com
If you are still in the edit view, click the export button on the bottom right of the screen. If you are in library view, select the image you want to export and then click the export button on the bottom right of the screen.

The export options window opens.
The first thing to do is click browse and select which folder you want to save the exported version of the image to. I will select the silver-collector folder I created earlier, but you can use any folder you wish.
In ‘name of exported folder’, I will put ‘web’. This will create a folder inside the silver-collector folder, called web, where the exported images will be saved.
Select ‘resize to’ and enter 500 in the box below. This will resize your image so that the longest side is 500 pixels in length.
Select ‘Automatic’ for image quality.
Your window should look something like this…
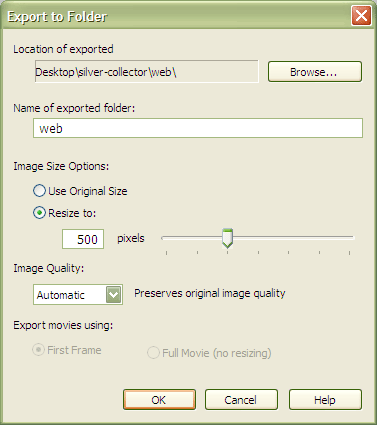
Click OK. Picasa will save the image.
That’s it! The image you just saved will be in the perfect format for uploading to silver-collector.com. Enjoy!
For in depth doucmentation on using Picasa, please visit
